#API Dashboard
Explore tagged Tumblr posts
Visit Tumblr Blog
Explore Tumblr blogs with no restrictions, modern design and the best experience.
Last Seen Tumblr Blogs


Fun Fact
The most popular pages on Tumblr are about Minecraft, GIFs, and David J. Peterson.
Text
there are potential spreadsheets everywhere for those with the eyes to see
#relevant to nothing I just looooove data and automation and processing and dashboards :)#lee speaks#adding your smile to my spreadsheet. extracting this beautiful sunny day using an api. etc etc
1 note
·
View note
Text
Upgrade Your Corporate Video Content: Expert Tips & Gear for 2025
New Post has been published on https://thedigitalinsider.com/upgrade-your-corporate-video-content-expert-tips-gear-for-2025/
Upgrade Your Corporate Video Content: Expert Tips & Gear for 2025

Ready to take your corporate video content to the next level? In this Videoguys Live episode, we dive into the latest tools, techniques, and workflows for upgrading your video production in corporate spaces. Whether you’re building a studio, improving hybrid meetings, or creating professional training videos this show is for you!
Watch the full video below:
youtube
Better Video Conferencing
Turn your favorite camera into a USB Camera with a Video Grabber
Upgrade your web cam with a small box camera…
Or a PTZ camera – perfect for larger rooms!
Upgrade Your Video Quality with USB Capture Cards
One way to upgrade your video quality into teams is to use a camcorder a capture
Upgrade your Web Cams with Box Cameras
Superior Image Quality: up to 4K resolution and larger sensors deliver sharper, more professional visuals, even in low-light conditi
Professional Connectivity: HDMI, SDI, and NDI|HX outputs for integration with pro AV systems—far beyond USB webcam limitations.
Built-in Audio Inputs: High Quality 3.5mm inputs enable direct connection of pro microphones.
Zoom and Framing Flexibility: High-quality fixed lenses offer far better framing and field of view options than webcams.
PTZ Cameras
Set-up Your Conference Room with the Newest AV Technology
Get the freedom to move with auto-tracking cameras
Follow your speakers with Voice-tracking AV technology
Use integrated control modules with your production gear for seamless operation and control
Auto Tracking Advanced Capabilities
It is exactly what it sounds like
A PTZ that will follow a subject without the need for manual control
VOICE Tracking Advanced Capabilities
It is exactly what it sounds like
A PTZ that will follow a VOICE subject without the need for manual control
Production Tools with API Integration
What is API Integration?: API (Application Programming Interface) integration allows production tools to be controlled, automated, and connected with other systems or software—like scheduling platforms, control rooms, or cloud services.
Centralized Control: Integrate cameras, encoders, and recording tools into a single dashboard or corporate AV system (e.g., Crestron, Q-SYS, custom UIs).
Scalable Deployment: Easily manage multiple rooms or events from acentral IT team using standardized commands.
Data Integration: Send metadata, user info, or system status to asset management or analytics platforms.
Getting even more in your conference room and boardroom
Better presentation tools with large LED Display walls, touchscreens and digital whiteboards
Network connectivity with AV over IP
Remote production
LED Display Technology
Seamless Visuals: LED displays offer bezel-free, ultra-clear visuals—ideal for presentations, data, and video conferencing.
High Brightness & Contrast: Delivers vivid images even in well-lit environments, ensuring visibility for all attendees.
Long Lifespan & Low Maintenance: Durable and energy-efficient, making them cost-effective for long-term use.
Plug and Play: No drivers or setup needed for quick and easy use.
Call us for more information on all Absen LED walls at (800) 323 2325
Connect all your AV Over IP devices with NETGEAR M4250 Switches

Remote Production in Corporate Environments
Control Cameras and Systems from Anywhere – Operate PTZ cameras, switchers, and audio remotely, reducing the need for on-site staff.
Efficient Use of Resources – Minimize travel and on-site technical crews, lowering costs while maintaining high production quality.
Seamless Collaboration Across Teams – Enable producers, editors, and presenters to work together in real-time from different locations.
Scalable for Global Operations – Support productions across multiple offices or regions with centralized control.
Video Can Also Help Business in Many Other Areas
Marketing
PR
Training
Product Releases
Etc…
Videoguys is Your Source for all Corporate AV Productions! Call Us at 800-323-2325 or Visit Videoguys.com for More Info
#2025#4K#amp#Analytics#API#audio#box#Building#Business#Cameras#Capture#Cloud#cloud services#Collaboration#conference#connectivity#content#dashboard#data#Data Integration#deployment#devices#display#displays#easy#energy#Events#Full#Gear#Global
0 notes
Text
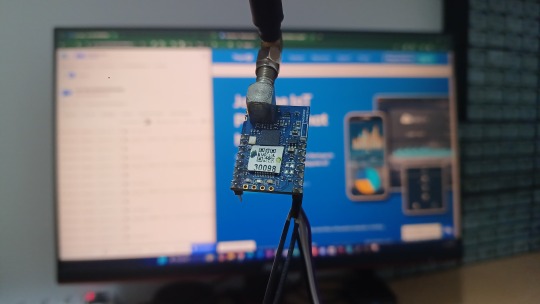
TagoIO: Primeiros passos para leigos
TagoIO é uma plataforma IoT que simplifica o gerenciamento e análise de dados de dispositivos conectados. Neste post, você verá como criar aplicações com uma interface intuitiva, acessível via web e mobile.
TagoIO é uma plataforma poderosa para IoT que facilita o gerenciamento e a análise de dados de dispositivos conectados. Neste post, vamos explorar boa parte da plataforma ao ponto de deixar tudo o mais “mastigado” possível, o suficiente para conseguir montar suas aplicações. 1. O que é TagoIO? TagoIO é uma plataforma de IoT (Internet das Coisas) que permite coletar, armazenar e analisar dados…
#Arduino TagoIO#Tago.io alternative#Tago.io analysis#TagoAI#tagoio#TagoIO admin#tagoio api#TagoIO Arduino#tagoio community#tagoio dashboard#tagoio esp32#TagoIO login#TagoIO MQTT#TagoIO pricing#TagoIO SDK
0 notes
Text
HighCharts API And Looker Chart Config Editor Tips & tricks

Make your data story more comprehensive by using personalized Looker charts and visualizations with HighCharts API.
Looker Chart Config Editor Tips And tricks
A collection of numbers is all that data is unless it can be used to tell a story and obtain further information. Google Cloud is always working to enhance Looker’s features so you can work together with reliable metrics and share your data stories. It has added the capability to add bullet chart, sunburst, venn, and treemap visualizations to Looker Explores and dashboards by utilizing the Chart Config Editor to previously available Looker visualizations. It wanted to offer some best practices on how to use the Chart Config Editor to enrich your visualizations and make meaningful data experiences so that you can make the most of these new Looker visuals.
HighCharts API
For those who are unfamiliar with the Chart Config Editor, Looker visualizations show your data using the Highcharts interactive charting library. You may customize your visualizations by utilizing the editor, which exposes portions of the Highcharts library API. In order to enhance your visualizations, it will explore the Highcharts API and discover some useful Chart Config Editor tips and tricks in this post. You need have access to Chart Config Editor and be familiar with the JSON format in order to fully comprehend its examples in order to get the most out of this post.
HighCharts API reference
In a line chart, set the labels and look of each line
Consider a representation of a line chart that shows several time series, each represented by a single line. You might find it difficult to distinguish between the lines in the dashboard viewer, or you might want to highlight a certain line more than others. Highchart offers several `series} properties that you can use to modify how each line is presented and styled. Among the qualities are:
{dashStyle} to alter the pattern of each line
To alter the thickness of every line, use {lineWidth}.
{opacity} to alter the opacity of each line
Use dataLabels to add labels to the values or data on a line.
You can apply each {series} property in any combination to make the data in your line visualization easier for your stakeholders to grasp.
By setting the default styling across all lines using Highchart’s plotOptions attribute, you can further simplify the settings shown in the above sample. Afterwards, you may use the {series} element, which changes the default styling, to further modify individual lines. The following Chart Config Editor setting sample shows both the overriding and default styling:
Allowing visuals to scroll inline
Imagine a column chart visualization where each column represents a month and the date time x-axis spans several decades. The width of your dashboard limits the visualization you may use, so as time goes on, the widths of each column get smaller and the monthly or annual trends are compressed, making them difficult to grasp.
To enable horizontal scrolling for your stakeholders through a column or line-chart visualization, try defining the width of your visualization using Highchart’s chart.scrollablePlotArea} attribute. TheminWidthattribute allows you to establish the minimum width of your visualization, while thescrollPositionX` attribute allows you to specify the visualization’s starting scrolling position. The visualization’s minimum width of 2,000 pixels and its initial scrolling position to the right are established in the Chart Config Editor configuration sample below.
chart: { scrollablePlotArea: { minWidth: 2000, scrollPositionX: 1 } },
Try experimenting with the scrollPositionY} andminHeight` attributes as well to allow scrolling vertically in your visualizations.
Complete control over the data labels for additional chart visualizations, such as pie charts
You can name each pie slice using the plot menu options in a pie chart visualization, but usually you can just display the slice’s value or percentage. To fully comprehend all of the data, the observer must perform a double take, glancing between the legend and the data labels. Additionally, all of the data will not be accessible in a scheduled PDF delivery of the dashboard containing the visualization, even if users might mouseover each pie slice to view it.
To help your stakeholders quickly extract information from your charts, you can use the Chart Config Editor to display any information that is available on the HighCharts PointLabelObject on the data labels. This includes the percentage and value displayed simultaneously. You can also further customize the labels with HTML. To modify the format and style of a chart’s data labels, you must set up the previously stated Highchart {dataLabels} attribute from its first example. The following {dataLabels` attributes need to be configured:
{enabled}, as demonstrated in our first example, to enable data labels on the chart
To enable HTML styling of data labels, use useHTML.
To apply CSS styles to every data label, use {style}.
Use {format} to specify the piece and format.
The data labels of the pie chart are shown in the Chart Config Editor configuration sample below with a font size of 12 pixels. If the property name for the format} attribute is enclosed in curly braces, then all of the PointLabelObject's properties can be shown in the data label. The example assigns the following string to theformat` attribute}:
The pie slice name bolded with the key attribute of the PointLabelObject within an HTML Draw Focus On This Aspect
The value of the data point with the `y} property of the PointLabelObject
Specifies the percentage of the data point with one decimal place formatting using the PointLabelObject’s percentage property
The format of the final data label is as follows: Category: 11.5%, 596524.
Keep in mind that the tooltip.format} attribute and thedataLabels.format} attribute function similarly; the documentation has more information on this. Also take note that for pie charts, it need the plotOptions.pie.dataLabels} attribute. You must override theplotOptions.line.dataLabelsattribute if you wish to format a line chart with the same data-label style. The interface and functionality of many chart kinds are mostly shared via thedataLabels` element.
Make your charts more insightful and powerful
We hope that these illustrations will work as a springboard for you as you investigate the HighCharts API and discover how to set up your Looker visualizations to convey useful and compelling narratives. You now know how to enable inline scrolling of visualizations, edit data labels, and change the appearance of each series of your data using the Looker Chart Config Editor and HighCharts API.
Read more on govindhtech.com
#HighChartsAPI#LookerChartConfig#EditorTips#GoogleCloud#dashboard#Lookervisualizations#Makeyourcharts#chartvisualizations#datalabels#tricks#api#technology#technews#news#govindhtech
0 notes
Text
youtube
In this Exploding Topics Pro Demo I'm going to show you all Exploding Topics Pro features.
And how to use those features to find topics, startups and products that sell!
You might have high quality content but if people are not interested you won't see a lot of results.
And It’s hard to figure out what’s currently popping if you don’t have a trends research tool!
Exploding Topics Pro is one of the best tools to find high interest topics, products, business opportunities... before they even become popular.
If you want to see how it works then watch my Exploding Topics Pro Demo. It will paint a better picture than a review.
This Exploding Topics Pro Demo will be perfect if you are thinking about buying it or learning how to use the tool.
#exploding topics pro#exploding topics pro demo#exploding topics pro dashboard#exploding topics pro features#exploding topics pro tutorial#exploding topics pro api#exploding topics pro business#trends database#trend search#trend tracking#trend analysis#trend forecasting#trend reports#trending topics#trending startups#trending products#meta trends#how to find trends#brian dean#trends#seo#digital marketing#Youtube
0 notes
Text
Tumblr JS Reblogged on Friday 01 SEP 2023
Tumblr.js is back!
Hello Tumblr—your friendly neighborhood Tumblr web developers here. It’s been a while!
Remember the official JavaScript client library for the Tumblr API? tumblr.js? Well, we’ve picked it up, brushed it off, and released a new version of tumblr.js for you.
Having an official JavaScript client library for the Tumblr API means that you can interact with Tumblr in wild and wonderful ways. And we know as well as anybody how important it is to foster that kind of creativity.
Moving forward, this kind of creativity is something we’re committed to supporting. We’d love to hear about how you’re using it to build cool stuff here on Tumblr!
Some highlights:
NPF post creation is now supported via the createPost method.
The bundled TypeScript type declarations have been vastly improved and are generated from source.
Some deprecated dependencies with known vulnerabilities have been removed.
Intrigued? Have a look at the changelog or read on for more details.
Migrating
v4 includes breaking changes, so if you’re ready to upgrade to from a previous release, there are a few things to keep in mind:
The callback API has been deprecated and is expected to be removed in a future version. Please migrate to the promise API.
There is no need to use returnPromises (the method or the option). A promise will be returned when no callback is provided.
createPost is a new method for NPF posts.
Legacy post creation methods have been deprecated.
createLegacyPost is a new method with the same behavior as createPost in previous versions (rename createPost to createLegacyPost to maintain existing behavior).
The legacy post creation helpers like createPhotoPost have been removed. Use createLegacyPost(blogName, { type: 'photo' }).
See the changelog for detailed release notes.
What’s in store for the future?
We'll continue to maintain tumblr.js, but we’d like to hear from you. What do you want? How can we provide the tools for you to continue making cool stuff that makes Tumblr great?
Let us know right here or file an issue on GitHub.
Some questions for you:
We’d like to improve types to make API methods easier to use. What methods are most important to you?
Are there API methods that you miss?
Tumblr.js is a Node.js library, would you use it in the browser to build web applications?
228 notes
·
View notes
Text
right so i was fucking around with the tumblr api and decided to investigate the possibility of automating my blog expansion plans. the idea was to find out who the people i reblog from get their reblogs from, and follow those people if i dont already. while experimenting with this (fairly suboptimal and indefinitely postponned) possibility, i realized that, knowing that these posts are already coming from cool people, i could determine with surprising certainty if i should reblog a post or not by looking for keywords within the post and evaluating the additions made in the notes as well as its overall structure, without the use of ai systems, just with bad ducktape scripting, just like god intended.
knowing this, arose the possibility for me to create a fairly accurate albeit sanitized clone of my blog, which would operate automatically (with no outside feedback other than me fixxing the code with my own bare hands), collecting and evaluating posts on a daily cycle (depending on api limits). it will have a dashboard composed of the people i already follow, removing anyone who wasnt active in over two months, and will use some spaghetti to expand from that in the future. initially, it will reblog anything it deems safe and good enough, but if possible, i plan in stopping it from reblogging anything i reblog with @thanook and pushing it to the daily blog limit, to spice things up. if this projects proves to actually be a good idea, i will make plans to host it properly, and improve its DIRT (Do I Reblog This) evaluation, which will be barebones for the first few post batches. still figuring this out, but im using this as a learning experience, which will force me to finish the project in a forgivable state (unlike DIPLOMATA and Goblinheimer, which wont see the light of day (there's your closure, happy now?)).
this project, however, lacks a name. i can put toghether a quick phtoshop for the pfp, ill probably figure out a banner in time and i already have a few ideas for a colorscheme, but im pretty dead of a decent name.
so, yall got anything?
117 notes
·
View notes
Text
Hot news from twitter: the API limits got reduced yesterday because Elmo is screaming for money and now everybody's getting indefinitely rate limited for such crimes as 'scrolling own dashboard too fast', 'looking at comments' and 'running a search'. A+ well done
Everyone says every new bad change makes the place unusable but this may genuinely make it unusable
2K notes
·
View notes
Text
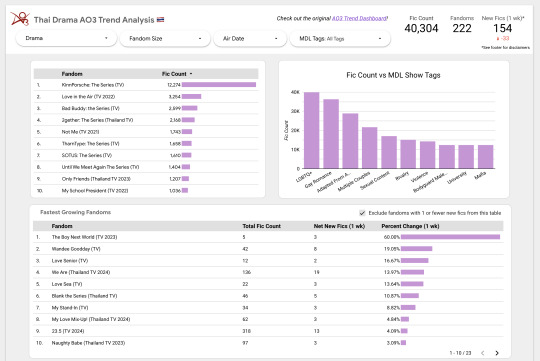
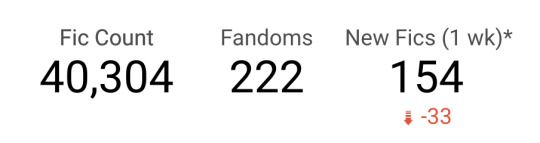
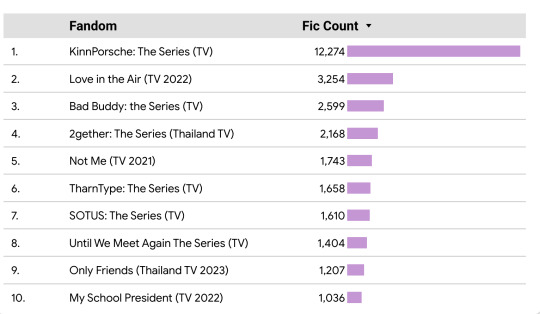
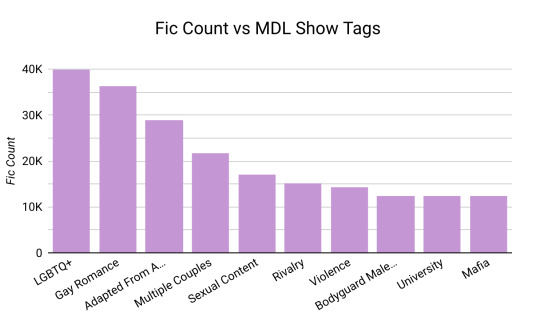
Introducing the Thai Drama AO3 Trends Dashboard! (Beta) 🇹🇭
Over the last several weeks or so I've been building an auto-scraping setup to get AO3 stats on Thai Drama fandoms. Now I finally have it ready to share out!
Take a look if you're interested and let me know what you think :)
(More details and process info under the cut.)
Main Features
This dashboard pulls in data about the quantity of Thai Drama fics over time.
Using filters, it allows you to break that data down by drama, fandom size, air date, and a select number of MyDramaList tags.
You can also see which fandoms have had the most new fics added on a weekly basis, plus the growth as a percentage of the total.
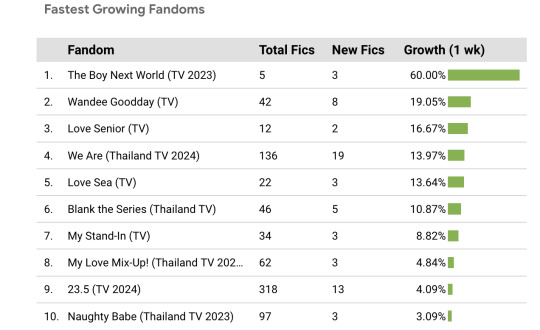
My hope is that this will make it easier to compare Thai Drama fandoms as a collective and pick out trends that otherwise might be difficult to see in an all-AO3 dataset.
Process
Okay -- now for the crunchy stuff...
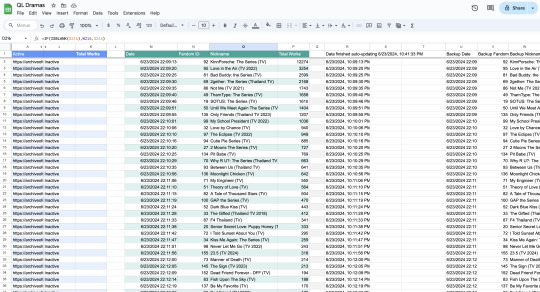
Scraping 🔎
Welcome to the most over-complicated Google Sheets spreadsheet ever made.
I used Google Sheets formulas to scrape certain info from each Thai Drama tag, and then I wrote some app scripts to refresh the data once a day. There are 5 second breaks between the refreshes for each fandom to avoid overwhelming AO3's servers.
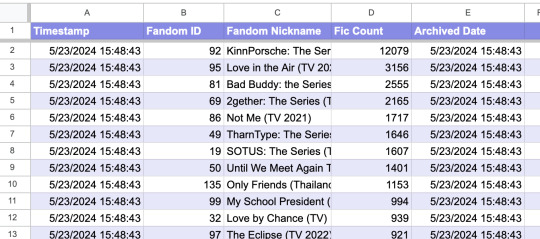
Archiving 📁
Once all the data is scraped, it gets transferred to a different Archive spreadsheet that feeds directly into the data dashboard. The dashboard will update automatically when new data is added to the spreadsheet, so I don't have to do anything manually.
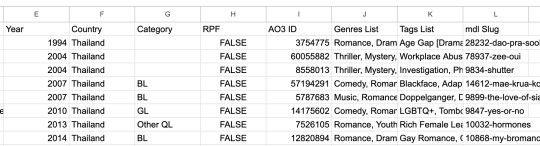
Show Metadata 📊
I decided to be extra and use a (currently unofficial) MyDramaList API to pull in data about each show, such as the year it came out and the MDL tags associated with it. Fun! I might pull in even more info in the future if the mood strikes me.
Bonus - Pan-Fandom AO3 Search
Do you ever find it a bit tedious to have like, 15 different tabs open for the shows you're currently reading fic for?
While making this dash, I also put together this insane URL that basically serves as a "feed" for any and all new Thai drama fics. You can check it out here! It could be useful if you like checking for new fics in multiple fandoms at once. :)
Other Notes
Consider this dashboard the "beta" version -- please let me know if you notice anything that looks off. Also let me know if there are any fandoms missing! Thanks for checking it out!
The inspiration for this dashboard came from @ao3-anonymous 's AO3 Fandom Trend Analysis Dashboard, which I used as a jumping off point for my own data dash. Please give them some love <3
#in which i am the biggest nerd ever#thai bl#thai drama#lgbt drama#ql drama#data science#acafan#fandom data visualization#fanfiction data
287 notes
·
View notes
Text
Quick Tumblr Backup Guide (Linux)
Go to www.tumblr.com/oauth/apps and click the "Register Application" button
Fill in the form. I used the following values for the required fields: Application Name - tumblr-arch Application Website - https://github.com/Cebtenzzre/tumblr-utils Application Description - tumblr archival instance based on tumblr-utils Adminstrative contact email - < my personal email > Default callback URL - https://github.com/Cebtenzzre/tumblr-utils OAuth2 redirect URLs - https://github.com/Cebtenzzre/tumblr-utils
Get the OAuth Consumer Key for your application. It should be listed right on the www.tumblr.com/oauth/apps page.
Do python things:
# check python version: python --version # I've got Python 3.9.9 # create a venv: python -m venv --prompt tumblr-bkp --upgrade-deps venv # activate the venv: source venv/bin/activate # install dependencies: pip install tumblr-backup pip install tumblr-backup[video] pip install tumblr-backup[jq] pip install tumblr-backup[bs4] # Check dependencies are all installed: pip freeze # set the api key: tumblr-backup --set-api-key <OAuth Consumer Key>
So far I have backed up two blogs using the following:
tumblr-backup --save-audio --save-video --tag-index --save-notes --incremental -j --no-post-clobber --media-list <blog name>
There have been two issues I had to deal with so far:
one of the blogs was getting a "Non-OK API repsonse: HTTP 401 Unauthorized". It further stated that "This is a dashboard-only blog, so you probably don't have the right cookies. Try --cookiefile." I resolved the issue by a) setting the "Hide from people without an account" to off and b) enabling a custom theme. I think only step a) was actually necessary though.
"Newly registered consumers are rate limited to 1,000 requests per hour, and 5,000 requests per day. If your application requires more requests for either of these periods, please use the 'Request rate limit removal' link on an app above." Depending on how big your blog is, you may need to break up the download. I suspect using the "-n COUNT" or "--count COUNT" to save only COUNT posts at a time, combined with the "--incremental" will allow you to space things out. You would have to perform multiple passes though. I will have to play with that, so I'll report back my findings.
82 notes
·
View notes
Text
Friday, September 1st, 2023
🌟 New
On web, you can now purchase a new Tumblr Supporter badge that levels up over time, so you can show your support for the platform and help us pay the bills around here more directly. Expect to hear more about this on the @staff blog soon!
In the latest experiment on web that makes changes to the post header, we’ve altered it to re-include the post author’s avatar, based on the feedback we’ve received so far. Thank you to everyone sending in feedback about this!
We’ve released a new major version of the tumblr.js API client, which you can use to access Tumblr content via our public API. Read more about it here!
We’ve also rolled out Tumblr Live to even more countries in the European Union!
🛠 Fixed
For those of you who still see floating avatars on the web, we fixed a bug that was causing them to “hide” a little under the dashboard tab bar. Similarly, we fixed a bug that was causing posts to be in the wrong position when using J and K to navigate post-by-post.
For those of you who see the new dashboard tab configuration button on web, we’ve added a little more space to the left side of it, so tabs have less of a chance to overlap with it. Similarly, sponsored tabs show a “Sponsored” label next to them in this dashboard tab configuration view.
🚧 Ongoing
We’re still experimenting with a big performance improvement for how content is shown on the web, but it broke being able to use Command/Control + F to search for text on the page, for content that’s been hidden after scrolling away from it. We’re working on making this better, and we have a fix in place, so please give it a try again if you’ve been having difficulty with it!
🌱 Upcoming
Nothing new to report here. There’s a lot of fun stuff coming though!
Experiencing an issue? File a Support Request and we’ll get back to you as soon as we can!
Want to share your feedback about something? Check out our Work in Progress blog and start a discussion with the community.
869 notes
·
View notes
Text
Using Pages CMS for Static Site Content Management
New Post has been published on https://thedigitalinsider.com/using-pages-cms-for-static-site-content-management/
Using Pages CMS for Static Site Content Management
Friends, I’ve been on the hunt for a decent content management system for static sites for… well, about as long as we’ve all been calling them “static sites,” honestly.
I know, I know: there are a ton of content management system options available, and while I’ve tested several, none have really been the one, y’know? Weird pricing models, difficult customization, some even end up becoming a whole ‘nother thing to manage.
Also, I really enjoy building with site generators such as Astro or Eleventy, but pitching Markdown as the means of managing content is less-than-ideal for many “non-techie” folks.
A few expectations for content management systems might include:
Easy to use: The most important feature, why you might opt to use a content management system in the first place.
Minimal Requirements: Look, I’m just trying to update some HTML, I don’t want to think too much about database tables.
Collaboration: CMS tools work best when multiple contributors work together, contributors who probably don’t know Markdown or what GitHub is.
Customizable: No website is the same, so we’ll need to be able to make custom fields for different types of content.
Not a terribly long list of demands, I’d say; fairly reasonable, even. That’s why I was happy to discover Pages CMS.
According to its own home page, Pages CMS is the “The No-Hassle CMS for Static Site Generators,” and I’ll to attest to that. Pages CMS has largely been developed by a single developer, Ronan Berder, but is open source, and accepting pull requests over on GitHub.
Taking a lot of the “good parts” found in other CMS tools, and a single configuration file, Pages CMS combines things into a sleek user interface.
Pages CMS includes lots of options for customization, you can upload media, make editable files, and create entire collections of content. Also, content can have all sorts of different fields, check the docs for the full list of supported types, as well as completely custom fields.
There isn’t really a “back end” to worry about, as content is stored as flat files inside your git repository. Pages CMS provides folks the ability to manage the content within the repo, without needing to actually know how to use Git, and I think that’s neat.
User Authentication works two ways: contributors can log in using GitHub accounts, or contributors can be invited by email, where they’ll receive a password-less, “magic-link,” login URL. This is nice, as GitHub accounts are less common outside of the dev world, shocking, I know.
Oh, and Pages CMS has a very cheap barrier for entry, as it’s free to use.
Pages CMS and Astro content collections
I’ve created a repository on GitHub with Astro and Pages CMS using Astro’s default blog starter, and made it available publicly, so feel free to clone and follow along.
I’ve been a fan of Astro for a while, and Pages CMS works well alongside Astro’s content collection feature. Content collections make globs of data easily available throughout Astro, so you can hydrate content inside Astro pages. These globs of data can be from different sources, such as third-party APIs, but commonly as directories of Markdown files. Guess what Pages CMS is really good at? Managing directories of Markdown files!
Content collections are set up by a collections configuration file. Check out the src/content.config.ts file in the project, here we are defining a content collection named blog:
import glob from 'astro/loaders'; import defineCollection, z from 'astro:content'; const blog = defineCollection( // Load Markdown in the `src/content/blog/` directory. loader: glob( base: './src/content/blog', pattern: '**/*.md' ), // Type-check frontmatter using a schema schema: z.object( title: z.string(), description: z.string(), // Transform string to Date object pubDate: z.coerce.date(), updatedDate: z.coerce.date().optional(), heroImage: z.string().optional(), ), ); export const collections = blog ;
The blog content collection checks the /src/content/blog directory for files matching the **/*.md file type, the Markdown file format. The schema property is optional, however, Astro provides helpful type-checking functionality with Zod, ensuring data saved by Pages CMS works as expected in your Astro site.
Pages CMS Configuration
Alright, now that Astro knows where to look for blog content, let’s take a look at the Pages CMS configuration file, .pages.config.yml:
content: - name: blog label: Blog path: src/content/blog filename: 'year-month-day-fields.title.md' type: collection view: fields: [heroImage, title, pubDate] fields: - name: title label: Title type: string - name: description label: Description type: text - name: pubDate label: Publication Date type: date options: format: MM/dd/yyyy - name: updatedDate label: Last Updated Date type: date options: format: MM/dd/yyyy - name: heroImage label: Hero Image type: image - name: body label: Body type: rich-text - name: site-settings label: Site Settings path: src/config/site.json type: file fields: - name: title label: Website title type: string - name: description label: Website description type: string description: Will be used for any page with no description. - name: url label: Website URL type: string pattern: ^(https?://)?(www.)?[a-zA-Z0-9.-]+.[a-zA-Z]2,(/[^s]*)?$ - name: cover label: Preview image type: image description: Image used in the social preview on social networks (e.g. Facebook, Twitter...) media: input: public/media output: /media
There is a lot going on in there, but inside the content section, let’s zoom in on the blog object.
- name: blog label: Blog path: src/content/blog filename: 'year-month-day-fields.title.md' type: collection view: fields: [heroImage, title, pubDate] fields: - name: title label: Title type: string - name: description label: Description type: text - name: pubDate label: Publication Date type: date options: format: MM/dd/yyyy - name: updatedDate label: Last Updated Date type: date options: format: MM/dd/yyyy - name: heroImage label: Hero Image type: image - name: body label: Body type: rich-text
We can point Pages CMS to the directory we want to save Markdown files using the path property, matching it up to the /src/content/blog/ location Astro looks for content.
path: src/content/blog
For the filename we can provide a pattern template to use when Pages CMS saves the file to the content collection directory. In this case, it’s using the file date’s year, month, and day, as well as the blog item’s title, by using fields.title to reference the title field. The filename can be customized in many different ways, to fit your scenario.
filename: 'year-month-day-fields.title.md'
The type property tells Pages CMS that this is a collection of files, rather than a single editable file (we’ll get to that in a moment).
type: collection
In our Astro content collection configuration, we define our blog collection with the expectation that the files will contain a few bits of meta data such as: title, description, pubDate, and a few more properties.
We can mirror those requirements in our Pages CMS blog collection as fields. Each field can be customized for the type of data you’re looking to collect. Here, I’ve matched these fields up with the default Markdown frontmatter found in the Astro blog starter.
fields: - name: title label: Title type: string - name: description label: Description type: text - name: pubDate label: Publication Date type: date options: format: MM/dd/yyyy - name: updatedDate label: Last Updated Date type: date options: format: MM/dd/yyyy - name: heroImage label: Hero Image type: image - name: body label: Body type: rich-text
Now, every time we create a new blog item in Pages CMS, we’ll be able to fill out each of these fields, matching the expected schema for Astro.
Aside from collections of content, Pages CMS also lets you manage editable files, which is useful for a variety of things: site wide variables, feature flags, or even editable navigations.
Take a look at the site-settings object, here we are setting the type as file, and the path includes the filename site.json.
- name: site-settings label: Site Settings path: src/config/site.json type: file fields: - name: title label: Website title type: string - name: description label: Website description type: string description: Will be used for any page with no description. - name: url label: Website URL type: string pattern: ^(https?://)?(www.)?[a-zA-Z0-9.-]+.[a-zA-Z]2,(/[^s]*)?$ - name: cover label: Preview image type: image description: Image used in the social preview on social networks (e.g. Facebook, Twitter...)
The fields I’ve included are common site-wide settings, such as the site’s title, description, url, and cover image.
Speaking of images, we can tell Pages CMS where to store media such as images and video.
media: input: public/media output: /media
The input property explains where to store the files, in the /public/media directory within our project.
The output property is a helpful little feature that conveniently replaces the file path, specifically for tools that might require specific configuration. For example, Astro uses Vite under the hood, and Vite already knows about the public directory and complains if it’s included within file paths. Instead, we can set the output property so Pages CMS will only point image path locations starting at the inner /media directory instead.
To see what I mean, check out the test post in the src/content/blog/ folder:
--- title: 'Test Post' description: 'Here is a sample of some basic Markdown syntax that can be used when writing Markdown content in Astro.' pubDate: 05/03/2025 heroImage: '/media/blog-placeholder-1.jpg' ---
The heroImage now property properly points to /media/... instead of /public/media/....
As far as configurations are concerned, Pages CMS can be as simple or as complex as necessary. You can add as many collections or editable files as needed, as well as customize the fields for each type of content. This gives you a lot of flexibility to create sites!
Connecting to Pages CMS
Now that we have our Astro site set up, and a .pages.config.yml file, we can connect our site to the Pages CMS online app. As the developer who controls the repository, browse to https://app.pagescms.org/ and sign in using your GitHub account.
You should be presented with some questions about permissions, you may need to choose between giving access to all repositories or specific ones. Personally, I chose to only give access to a single repository, which in this case is my astro-pages-cms-template repo.
After providing access to the repo, head on back to the Pages CMS application, where you’ll see your project listed under the “Open a Project” headline.
Clicking the open link will take you into the website’s dashboard, where we’ll be able to make updates to our site.
Creating content
Taking a look at our site’s dashboard, we’ll see a navigation on the left side, with some familiar things.
Blog is the collection we set up inside the .pages.config.yml file, this will be where we we can add new entries to the blog.
Site Settings is the editable file we are using to make changes to site-wide variables.
Media is where our images and other content will live.
Settings is a spot where we’ll be able to edit our .pages.config.yml file directly.
Collaborators allows us to invite other folks to contribute content to the site.
We can create a new blog post by clicking the Add Entry button in the top right
Here we can fill out all the fields for our blog content, then hit the Save button.
After saving, Pages CMS will create the Markdown file, store the file in the proper directory, and automatically commit the changes to our repository. This is how Pages CMS helps us manage our content without needing to use git directly.
Automatically deploying
The only thing left to do is set up automated deployments through the service provider of your choice. Astro has integrations with providers like Netlify, Cloudflare Pages, and Vercel, but can be hosted anywhere you can run node applications.
Astro is typically very fast to build (thanks to Vite), so while site updates won’t be instant, they will still be fairly quick to deploy. If your site is set up to use Astro’s server-side rendering capabilities, rather than a completely static site, the changes might be much faster to deploy.
Wrapping up
Using a template as reference, we checked out how Astro content collections work alongside Pages CMS. We also learned how to connect our project repository to the Pages CMS app, and how to make content updates through the dashboard. Finally, if you are able, don’t forget to set up an automated deployment, so content publishes quickly.
#2025#Accounts#ADD#APIs#app#applications#Articles#astro#authentication#barrier#Blog#Building#clone#cloudflare#CMS#Collaboration#Collections#content#content management#content management systems#custom fields#dashboard#data#Database#deploying#deployment#Developer#easy#email#Facebook
0 notes
Text
Integração da TTN com a TagoIO
Aprenda como fazer integração da The Things Network (TTN) com a TagoIO para expandir seus estudos com LoRaWAN
A integração da TTN com a TagoIO é uma das diversas opções de integrações possíveis com a TagoIO e se você tem uma cobertura da TTN disponível, certamente vai querer testar essa integração. A TTN no Brasil é muito fraca se comparado com as duas principais coberturas de LoRaWAN no Brasil que é a American Tower (Everynet) e a Helium network. Porém a TTN é ótima para quem é projetista ou…
View On WordPress
#esp32 https tagoio#esp32 tagoio#esp8266 tagoio#tago#tago iot#tago.io#tago.io documentation#tagoio#tagoio api#tagoio community#tagoio dashboard#tagoio esp32#tagoio https#tagoio ttn
0 notes
Text
obviously everything with predstrogen and Matt's handling has been horrible, the moderation of Tumblr is obviously bad, I think a lot of people have discussed this better than I really could, I don't necessarily find litigating Matt's personal feelings on trans people compelling when it's abundantly clear that Tumblr and its moderation is structurally transmisogynistic.
I do wanna say, I think Matt's approach with addressing single cases and banning large accounts for venting/making fun of the situation is one of the most existentially bad things you can do as a platform CEO. trans people, and particularly a subset with high personal investment in the platform, provide much of the cultural cache and recruitment for the site. go look at, say, r/tumblr, or a tumblr repost page on Facebook or Twitter, and you're going to find overwhelmingly content by trans creators being posted there. and consider that these are the people who spend longer than average on the dashboard, driving engagement numbers to show advertisers. it's now been publicly demonstrated that demographic is not only more likely to be banned on dubious grounds, their cases will be publicly litigated and ridiculed by members of staff.
Compare to reddit, where the handling by staff was similar and the API restrictions hit a similar subset of the userbase. the amount of users that left wasn't statistically significant, but the quality and variance of posts dropped much more significantly. I think that Tumblr, being more of a walled garden whose recruitment is driven by the top .1% of posts being shared on other sites, is likely to be far more drastically affected.
idk what you should make of all that, just my two cents
116 notes
·
View notes
Text
does anyone know what the rules are for tumblr's api?
Don't re-implement the Dashboard, and don't recreate complete Tumblr functions or clients on a platform where Tumblr already has an official client (like web, iPhone, Android, or Windows Phone 8).
i read this and was wondering if making a sort of "port" of tumblr to a game console (that doesnt already have an official client or a way to access tumblr) would be allowed
5 notes
·
View notes
Note
Unsure if you are aware of this update, but apparently someone got into the Twit api and believes that the "rate limiting" is actually a cover up by Elon bc they accidenlty pushed an update DDOSing their own site, which is why he says its "temporary" in his tweet. Not sure if Elon is actually trying to cover-up, or if the DDOS is an unintended side effect of the change
(With reference to this post here.)
As far as I can tell, the folks advancing that theory have it perfectly backwards. The rate limit isn't an effort to address the self-DDoS situation: the rate limit is causing the self-DDoS situation.
In a nutshell, when you load up Twitter in your browser, two things are happening:
In response to your initial request, Twitter's server sends your browser the information it needs to construct the website's user interface (UI).
Once the UI has been constructed within your browser, it instructs your browser to dispatch a separate request, via the Twitter API, requesting content (i.e., tweets and ads) to fill itself with.
(It's actually a little more complex than that, because the response to the initial request may come pre-filled with a portion of the required content in order to speed things up the first time you visit your dashboard, but that's the gist of it, anyway.)
So, what happens now that the rate limit is in place?
Well, the rate limit doesn't affect the first request – it's not using the API, so your browser is able to construct the Twitter UI just fine. The moment you try to scroll your Twitter dashboard, however, that triggers the Twitter UI that's been constructed within your browser to ask the Twitter API for more content so you can keep scrolling – and that request is subject to the rate limit.
If you happen already to have exceeded your rate limit, that request is going to receive a response along the lines of "Error 429 – Rate Limit Exceeded". Here's the trick: while Twitter did update the UI to reflect the addition of a rate limit (i.e., they're not complete idiots), it turns out they did an incomplete job, and certain dashboard widgets don't know what to do with an error 429.
Now, the fun part: apparently, what the affected Twitter dashboard widgets are coded to do when they receive a response they don't recognise is simply to ignore it and try again. Further, nobody thought to impose a delay between attempts, so they retry immediately upon receiving the unrecognised error 429. For users with snappy Internet service, this can result in their browser making multiple attempts per second to retrieve content for the affected Twitter dashboard widgets, receiving (and ignoring) the same error code each time.
And that's how Twitter ended up accidentally ordering its own users to DDoS its API.
3K notes
·
View notes